Food photography is one of the trendiest hobbies that’s in the market right now. It leaves your viewers hungry for more, literally and figuratively. The key to taking captivating food pictures is good plating, setup, and last but not the least, lighting.
Are you a frustrated food photographer who can’t seem to get good lighting details when it comes to your pictures? Creating a simple, DIY photobox may be the solution to your photography blunders. Read on to find out more about creating a photobox to take awesome food pics.
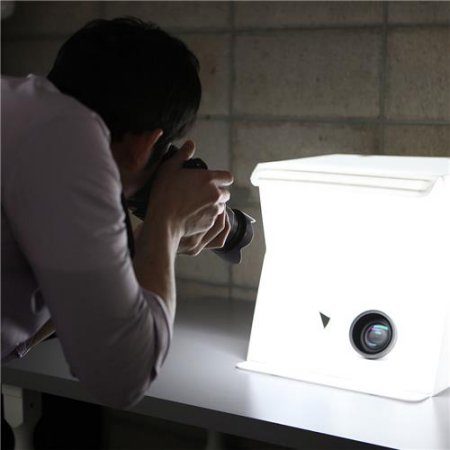
Why Create a Photobox for Your Food Pictures?
Creating a photobox is one of the many creative ways you can customize your setup to ensure that your photos have a good quality of lighting. Some professional photographers make use of the photobox to create still life photos that have excellent angles and lighting, which is used as photos of products on magazines, catalogs and online shopping websites.
Having a photobox means you can make your photos profitable, because they often create good quality images with lesser time to edit. You can also change your item’s lighting and angle depending on what you want to be featured on your photo. Expert, D. Scott Carruthers provides these easy steps below to help you create your very own photobox.
Steps on Creating a Photobox
Choose a cardboard box
Make sure to use a cardboard box that will allow your items to fit. If you shoot medium to small objects, a smaller box would do. But if you shoot bulky gadgets or appliances, you may need to have a larger box. Make sure that your box is free from damage and other imperfections that will affect your photos.
Secure the bottom of the box
Secure the bottom part of the box with packaging tape. Make sure that it is completely opaque, meaning no light can peek through the bottom of your box. Keep the top portion of the box open, because this is where you will place your items to shoot.
Lay the box sideways
Lay the box sideways, making the open side facing you and the secured side at the back.
Cut out a rectangular or square hole on both sides of the box
With the box facing you, cut out a equally sized square or rectangle on both side of the box. Make sure to leave around 1-2 inch margins. This hole’s purpose is to allow light to pass through a cloth.
Cover the holes with white cloth on both sides
Tape a cloth from the top portion, draping on the holes on the sides. Make sure that all parts of the holes are covered. This will serve as a filter to your lighting.
Glue white paper inside the box
Cover the whole inside of the box with white paper, making sure to use a thicker type so that glue marks will not be seen. Also make sure that the cloth covered hole isn’t covered up by the paper. This white background will be your set for the photobox.
Mount two lamps on both sides with a hole and cloth cover
The sides of the boxes will need two lamps. You may make sure of ordinary desk lamps, as the cloth will filter the light and give out a professional effect.
Place the food inside
Place your food items to be photographed inside the box, and make sure to capture the right angles.
Some Reminders for the Food Photobox
You have to remember that this DIY is quite delicate and may be prone to wear and tear. With maintenance, you can make use of this photobox for a longer period of time. Also make sure that your food items will not spill over your white paper inside the photobox, as this will create stains which are hard to edit in your photos. Make sure that placement inside and outside the box is done carefully.
Other than that, enjoy your DIY food photography photobox!
D Scott Carruthers is a California-based professional photographer with exposure to several local publications. He was also featured as a photographer for several national events covering celebrities and other public icons.